Monday, February 26, 2024

How to configure the SRM appliance after the deployment

Step 1: After deploying the appliance, connect to it via port 5480 and log in as the user admin.


2.  Select Summary on the left side and click on Configure Appliance


3. Specify the information of the vCenter Server/PSC and authenticate yourself to it.


4. Specify one of the two vCenters that you plan to use. Do the same for the second SRM appliance. 


5. Specify the site name and provide email information 


6. Verify your settings and click on Finish.


7. Connect to your vCenter Server via the vSphere Client.


8. Select Site Recovery 


9. Pair the two sites.


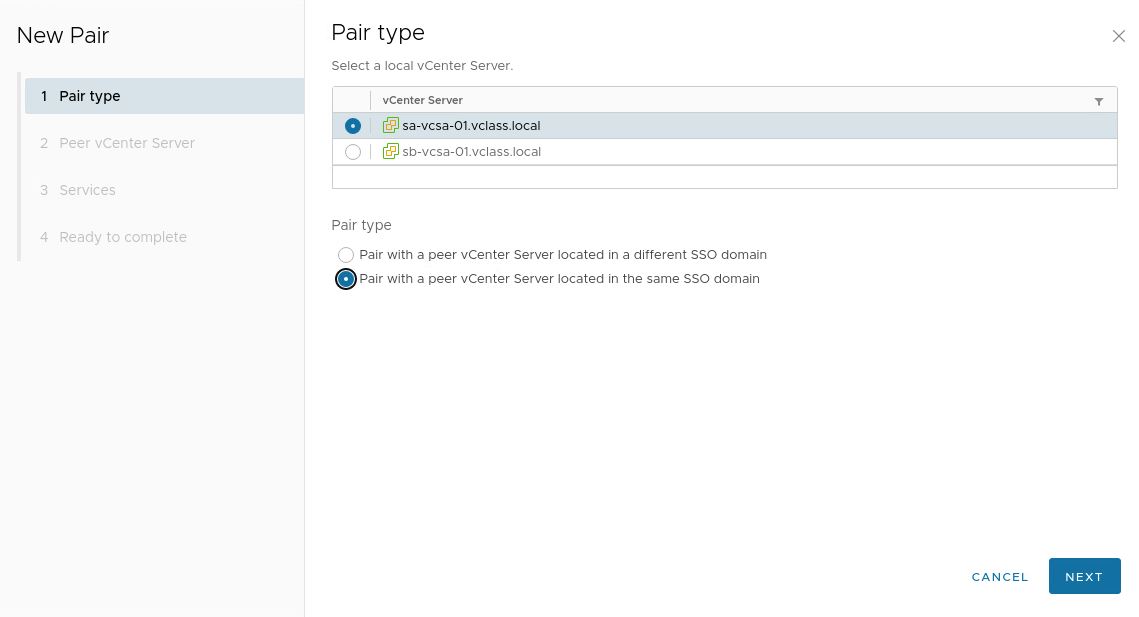
10. Select the other vCenter Server


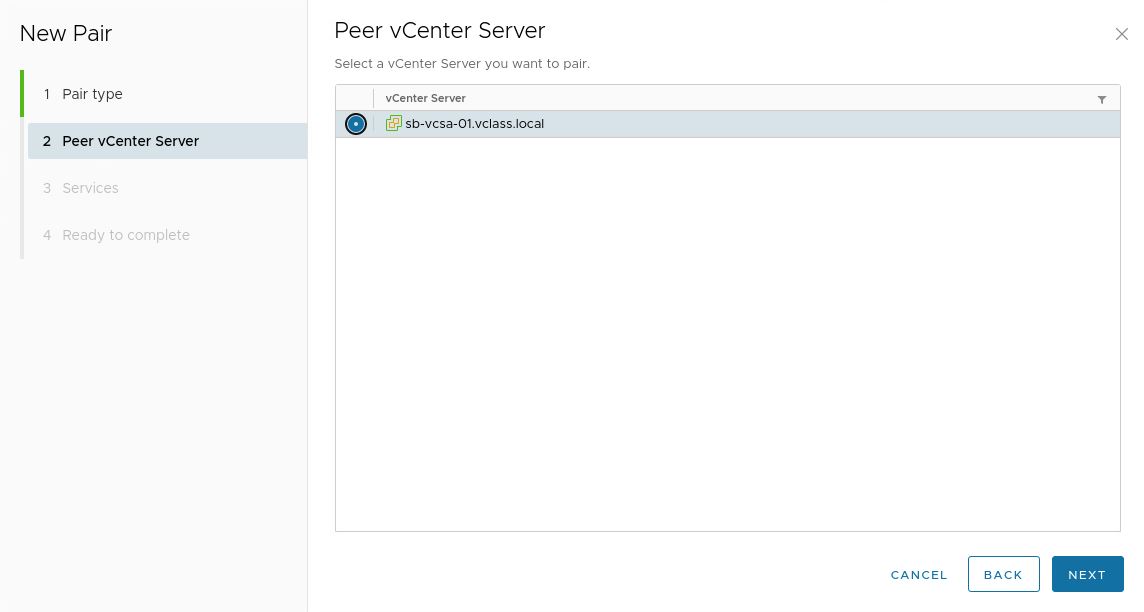
11. Review the services recognized and the pairing of the sites.


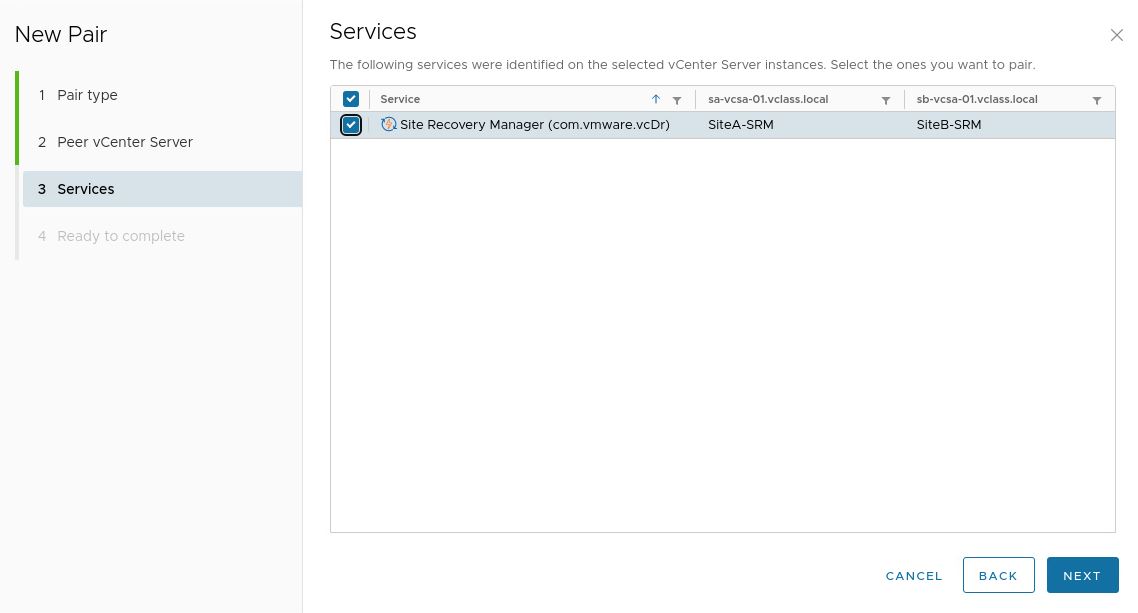
12. Click on Finish should everything look correct.


13. You shoud see the two vCenter Servers. 

Final Note: What is next?  Lots of things, inventory mappings, the deployment of the replication appliances, protection groups and recovery plans.


How to deploy the SRM appliance

1. Download the SRM appliance from https://customerconnect.vmware.com/en/downloads/info/slug/infrastructure_operations_management/vmware_site_recovery_manager/8_6 (or higher) and start the deployment via ovf.


2. Select the 5 files listed below
 

3. Select the name of the appliance and the datacenter to use.


4. Select the appropriate cluster for the appliance.


5. Review the details and click on next.


6. Agree to the EULA and proceed.


7. Select the number of cpus for the appliance and proceed.


8. Select the disk format, spbm and datastore to use.


9. Connect the appliance to your desired network/port group.


10. Add the needed passwords for root and the admin account.


11. Provide the appliance with a hostname and DB password.


12. Scroll down to take care of gateway and dns information.


13. Finish customizing the template by providing the ip address and netmask.


14. Review your choices, click on finish and eventually power on the appliance.


Thursday, November 30, 2023

vCenter Server Profile


vCenter Server Profile


What is a vCenter Profile? A vCenter Server Profile it is a tool introduced in 7.0 that creates a template from a known-good vCenter Server from which vCenter Server profiles may be created and applied.

The .json file can be copied to the target VCs, ensuring that they all inherit the same configuration settings, similar to a host profile for esxi hosts.

Step 1: Click on the home page of the vSphere Client and select Developer Center.


Step 2: Select your vCenter Server if necessary.


Step 3: On the top right, replace the word vcenter for appliance.


Step 4: Using the filtering capability, type profile to find infraprofile/configs.


Step 5: Expand infraprofile/configs and click on POST (in green) next to /api/appliance ...


Step 6: Click on Execute and Continue.


Step 7: Click on Download and save the resulting .json file in your favorite directory.


https://core.vmware.com/blog/achieve-consistent-configuration-across-vcenter-servers-vcenter-server-profiles

Friday, September 22, 2023

The M.O.B. (Managed Object Browser)

Using the M.O.B. to configure a VMware Tools Repository.

1. Launch a browser and point to the fully qualified name of your vcenter followed by /mob and log into the vcenter server using administrator@vsphere.local and your current password.


2. Once you log into the vcenter server, click on the word content.


3. Once you click on content, this is what you expect to see.


4. Press Control F and search for "datacenter". Click on the name "group-dX" next to (datacenters)


5. Click on the word datacenter-X next to the name of your datacenter (sa-datacenter)


6. Press Control F and type "host". Click on the word group-hX next to (host)


7. If your host is in a cluster, do a search for "domain" and click on the domain -cX next to your cluster (sa-production-01)


8. Find the host that you want to modify and click on host-XX next to your hostname


9. Do a search for "productLocker" and click on UpdateProductLocerLocation Task.


10. Next to String, point to the new location of your vmtoolsRepo using a full path. The change does NOT require a reboot. This can also be achieved via advance setttings; however, that would require a reboot.

Thursday, May 25, 2023

vSAN ESA Raid 1

 vSAN ESA Raid 1

2 way mirror vm

The perf leg is a two way mirror

The cap leg is redundant and striped


3 way mirror vm

The perf leg is a three way mirror

The cap leg is redundant and striped


4 way mirror vm

The perf leg is a four way mirror

The cap leg is redundant and striped


vSAN ESA Raid 5 and Raid 6

 vSAN ESA RAID 5 and RAID 6 vms

Note: The layout of the cap leg varies depending on the number of hosts.

Raid 5 vm with 8 hosts

The perf leg is a two way mirror.

The cap leg is Raid 5


Raid 6 vm with 8 hosts

The perf leg is a three way mirror.

The cap leg is Raid 6


Monday, May 1, 2023

VCLS and Retreat Mode


Activating Retreat Mode

New as of vSphere 7.0U1

Step 1: Select the cluster that needs to go into retreat mode.

Step 2: Look at the url of the cluster and document the four digits that follow domain-c word

Step 3: Select your vCenter Server and go to Configure

Step 4: Add an advance setting called config.vcls.clusters.domain-c????.enabled 

Step 5: In the value column, Add the word False

          Step 6: Click on ADD and then click on SAVE 


This change will automatically shut down and then delete these virtual machines.

For more information:

https://docs.vmware.com/en/VMware-vSphere/7.0/com.vmware.vsphere.resmgmt.doc/GUID-F98C3C93-875D-4570-852B-37A38878CE0F.html